Floorcloths Made Easy
Hi Everyone,
I know I've been gone from this blog site for quite a while. My apologies. I will try to be more diligent at keeping this current and interesting. I found a great project that you might enjoy. I found it at Martha Stewart.com. Enjoy, and I would love to pictures if anyone decides they would like to attempt this easy project. Let me know your ideas, comments by clicking on the comment button below. Thanks again,
Di
Creating art underfoot is an easy step-by-step process, and no fancy supplies or skills are required. Just prime a piece of canvas, paint a design, and seal it with varnish. Our patterns are as simple to reproduce as scattering leaves from your backyard across a surface, marking stripes with tape rather than a ruler, tracing bowls for circles, and painting streaky brushstrokes on a grid. Use household tools and our stencils or create your own. Don't worry about perfect lines; these rugs are handcrafted and should look it. So go ahead -- make the floor your canvas.
Easy-Care Accents:
These practical floorcloths are durable and inexpensive to make. They clean up with a damp mop and mild detergent. No wonder canvas rugs have been popular since colonial times. After the introduction of linoleum, they fell out of favor early in the last century. The craft was revived in the 1950s, when period rugs were made for historic homes. Modern materials have streamlined the technique; with today's quick-drying, water-based products, you can paint a rug this weekend and have it for years.
Painting TipsUse liquid acrylics (if you use heavy-body acrylics, which come in tubes, thin with water to the consistency of cream) and flat brushes in a variety of sizes. To match hues in your room's decor, you can mix tints: Combine titanium white with other colors for lighter shades, or add a dab of burnt umber to give an earthy tint. If you would like a warm, neutral background, paint the canvas with a wash of titanium buff (1 tablespoon paint mixed with 4 cups water). When customizing a shade of paint, you won't be able to reproduce it exactly once you've used it up, so don't skimp on amounts; to paint a solid color on a door-size canvas, you'll need about 2 cups. Use airtight jars to store the colors you've blended.
Painting TipsUse liquid acrylics (if you use heavy-body acrylics, which come in tubes, thin with water to the consistency of cream) and flat brushes in a variety of sizes. To match hues in your room's decor, you can mix tints: Combine titanium white with other colors for lighter shades, or add a dab of burnt umber to give an earthy tint. If you would like a warm, neutral background, paint the canvas with a wash of titanium buff (1 tablespoon paint mixed with 4 cups water). When customizing a shade of paint, you won't be able to reproduce it exactly once you've used it up, so don't skimp on amounts; to paint a solid color on a door-size canvas, you'll need about 2 cups. Use airtight jars to store the colors you've blended.
Prepping the Canvas:
Tools and Materials
drop cloth
hollow-core door, or 1/2-inch plywood cut to size
number 10 canvas duck, cut to dimensions of door or board plus a 6-inch margin
staple gun
paper cups
paint roller on broomstick
roller tray and liner white acrylic gesso
medium-grit sandpaper
It's easiest to stretch the canvas over a hollow-core door, which is lightweight and just the right size for a rug. For other dimensions, you can also use plywood cut to size. We primed both sides for added durability.
1. Working on a large table or on a drop cloth on the floor, center door or board on canvas. Smooth the fabric around to the back, stapling it at each side's midpoint. Continue stapling from the center points outward, about every 3 inches. Fold one side neatly under the other; staple at each corner (far left).
2. Flip the door, and support it on upside-down paper cups. Using a roller, prime the surface and edges with gesso (if using plywood, prime 1 inch border of underside, too). Let dry. Lightly sand. 3. Remove staples, and flip the canvas. Reposition canvas on door, matching up fold lines; staple again.
4. Prime surface and edges with gesso. Let dry; sand surface and edges. Add another coat. Let dry; sand.
Making a Leaf Rug:

Tools and Materials
liquid acrylic paints
paintbrushs in a variety of sizes
leaves or leaf stencil template
scissors
pencil self-adhesive shelf liner
tracing paper
1. Paint canvas with a wash of titanium buff acrylic (1 tablespoon paint to 4 cups water). Let dry.
2. Gather leaves, and photocopy groupings of them, life-size or enlarged (or download our templates). Cut out shapes, and trace them onto self-adhesive shelf liner (to help them stay put while you work). Cut out stencils.
3. To create ring templates, place tracing paper over leaf patterns and draw abstract ovals around them. Cut out shapes, and trace them onto shelf liner. Cut out stencils; cut away inner circle of each to form a ring.
4. Scatter leaf stencils over canvas. Peel a corner of the backing from a leaf, and press down to adhere; then slowly peel and flatten remainder.
5. Adhere ring stencils over leaves.
6. Paint background canvas except inside rings. Let dry.
7. Slowly peel off ring stencils, but not those of leaves. Paint in rings. Let dry.
8. Remove leaf stencils; paint lines for leaf veins in background color. Let dry.


Finishing Your Rug:
Tools and Materials
polyacrylic varnish
wide paintbrush
drop cloth
scissors
yardstick
pencil
1 roll double-sided carpet tape
bone folder or butter knife
1. Apply two coats of varnish to painted surface, according to label instructions. Let final coat dry overnight. Turn the door over, and lay it on a drop cloth on the floor; then unstaple the canvas.
2. The door's edges create two fold lines that delineate the hem. Trim excess canvas just outside outer fold line (if plywood was used, mark and trim to 1 inch outside the fold line).
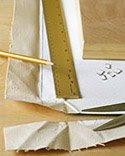
3. To miter the corners, fold in the hem on both sides of a corner so their edges meet; mark that point on each.
4. Lay the fabric flat again, and draw a line between the two points; it should intersect the corner of the inner fold line. Trim just outside the line that you've marked. Repeat with remaining corners.
5. Affix carpet tape to underside of hem on each side of canvas; press hem flat, and burnish with bone folder or the handle of a butter knife. Carefully turn over rug without bending it; let dry 4 days, or according to varnish directions, before using it. Lay it on the floor over a nonslip pad of the same size.

